[Springboot]Springfox Boot Starter
Swagger는 다양한 라이브러리가 있다. 그 중 Swagger2와 Swagger-ui 조합이 현재 가장 많이 사용된다.
오늘 포스팅에서는 스프링부트환경에서 Swagger2 라이브러리보다 쉽게 사용할 수 있는 Springfox Boot Starter를 소개하려고한다.
Springfox Boot Starter 라이브러리
Maven Repository Springfox Boot Starter에서 메이븐 또는 그레들 중 원하는 소스를 복사한다.
- Gradle
1 | // https://mvnrepository.com/artifact/io.springfox/springfox-boot-starter |
- 실행하기
서버를 실행한 뒤http://localhost:8080/swagger-ui/에서 바로 확인할 수 있다.
Annotation
| 종류 | 자주 사용하는 속성 | 설명 |
|---|---|---|
| @Api | tags | 해당 클래스를 Swagger에 표시함, API 클래스명을 한글로 제공 가능 |
| @ApiParam | value | 파라미터 설명(Description) |
| @ApiImplicitParams | @ApiImplicitParam와의 조합으로 파라미터 설명(Description) | |
| @ApiImplicitParam | name, value, dataTape | @ApiImplicitParams의 조합으로 파라미터 설명(Description) |
| @ApiResponses | code, message, response | @ApiResponse 조합으로 API 응답 지정 |
| @ApiModelProperty | value, example, required | 모델의 변수 설명 |
@ApiResponses로 응답지정시 주의점이 있다.
만약 code = 400 응답을 2개만들고 싶다면 어떻게 해야할까?
1 | (value = { |
위와 같이 동일 코드에 @ApiResponse를 2개이상 작성하면 message는 최상단 1개밖에 보이지 않는다.
즉 사용자 이름이 10자리 이상인 경우만 표시된다. 따라서 사용자 나이가 15살 이하인 경우도 표시하고 싶은 경우 아래처럼 message에 기입해야한다.
1 | (value = { |
예시
이제 전체 코드와 이미지 예시를 보자.
Controller.java
1
2
3
4
5
6
7
8
9
10
11
12
13
14
15
16
17
18
19
20
21
22
23
24
25
26
27
28
29
30
31
32
33
34
35
36
37
38
39
40
41
42
43
44
45
46
47
48
49(tags = "사용자 컨트롤러")
("/api")
public class ApiController {
("/hi")
public String hi() {
return "안녕";
}
("/plus/{x}")
public int plus(@ApiParam(value = "x 값") @PathVariable int x,
@ApiParam(value = "y 값") @RequestParam int y) {
return x+y;
}
({
// 필수속성: name, value, dataType
(name = "x", value = "x2 값", dataType = "int"),
(name = "y", value = "y2 값", dataType = "int")
})
("/plus2/{x}")
public int plus2(@PathVariable int x, @RequestParam int y) {
return x+y;
}
(value = "사용자 이름과 나이를 리턴하는 메서드")
(value = {
(code = 201, message = "리턴 성공", response = UserRes.class),
/* 동일코드 @ApiResponse를 작성하는 경우 첫번째 작성한 메시지만 노출된다.
// @ApiResponse(code = 400, message = "사용자 이름이 10자리 이상인 경우"),
// @ApiResponse(code = 400, message = "사용자 나이가 15살 이하인 경우")
* 따라서 하나의 메시지안에서 구분을 줘야한다.
* */
(code = 400, message = "1.사용자 이름이 10자리 이상인 경우 \t\n 2.사용자 나이가 15살 이하인 경우")
})
("/user")
public UserRes userGet(UserReq req) {
return new UserRes(req.getName(), req.getAge());
}
(value = "사용자 이름과 나이를 리턴하는 메서드")
("/user")
public UserRes userPost(@RequestBody UserReq req) {
return new UserRes(req.getName(), req.getAge());
}
}dto.java
1
2
3
4
5
6
7
8
9
10
public class UserRes {
(value = "사용자 이름", example = "가나다", required = true)
private String name;
(value = "사용자 나이", example = "100", required = true)
private int age;
}
1 컨트롤러 전체 및 사용자 컨트롤러의 메서드
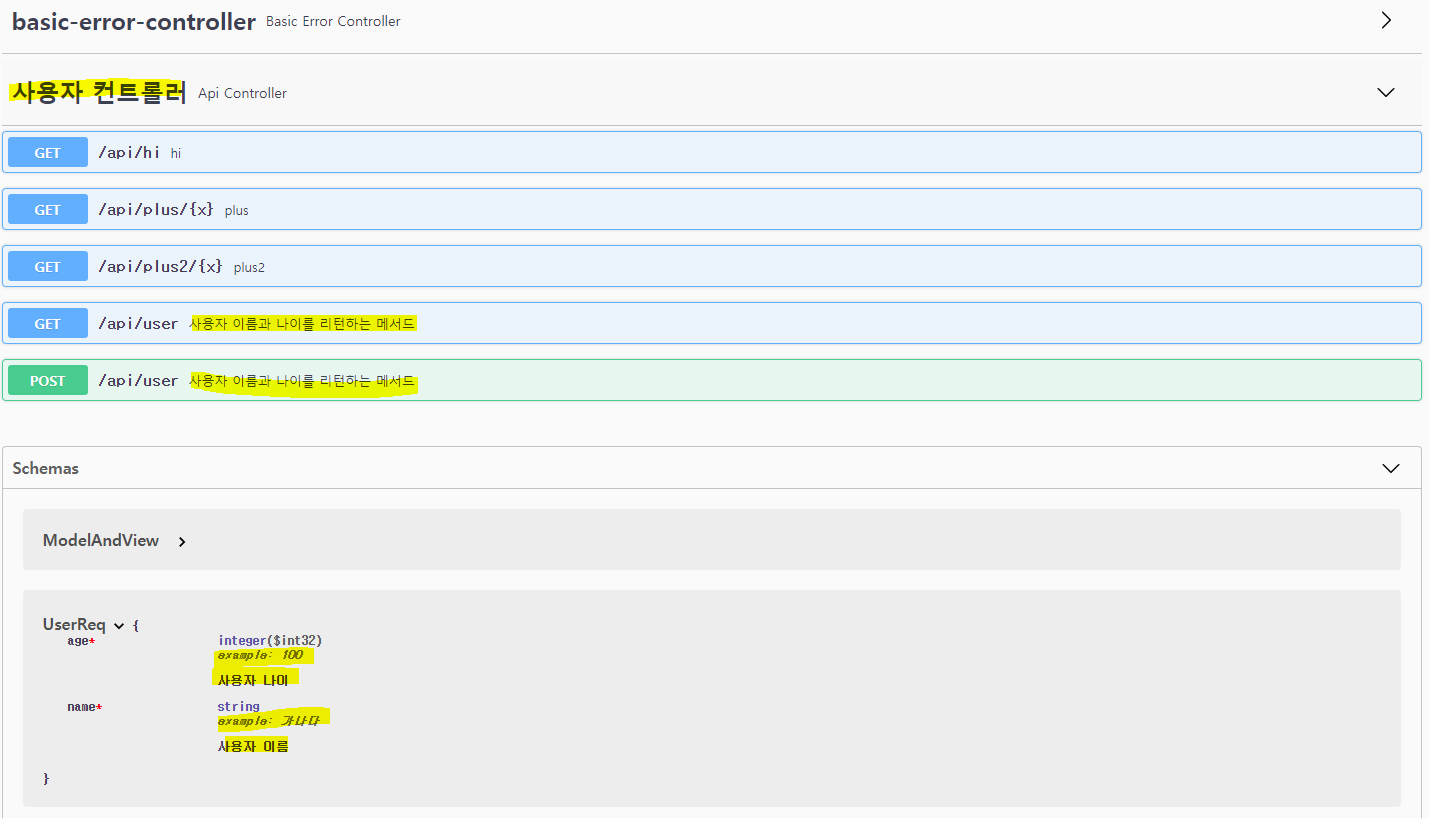
내가 만든 컨트롤러는 사용자 컨트롤러(Api Controller)인데 basic-error-controller는 도대체 뭘까?basic-error-controller는 Springfox Boot Starter라이브러리에서 기본적으로 제공되는 컨트롤러이다.사용자 컨트롤러(Api Controller)를 클릭하면 위 코드에서 작성한 GET메서드 4개와 POST메서드 1개를 확인할 수 있다.
그리고 @ApiOperation를 이용한 경우 메서드 URI옆에 설명이 기재됨을 확인할 수 있다.
2 /api/plus/{x}메서드, /api/plus2/{x} 메서드

GET메서드 /api/plus/{x}와 /api/plus2/{x}는 동일하게 swagger에 표시된다.
둘의 차이는 @ApiParam로 스웨거에 표시했는 지 @ApiImplicitParams로 스웨거에 표시했는 지이다.
3 /api/user 메서드

@ApiModelProperty로 기재한 설명과 example속성에 있는 내용도 잘 표기되어있다.
@ApiResponses로 표기한 각 코드마다의 message를 확인할 수 있다.
![[BookReview]모두의 네트워크 기초 BY 서지영](/img/240519book001.png)

![[네트워크] Socket(소켓) vs Websocket(웹소켓) 차이점](/img/240111OSI7LayerAndTCPIP.jpg)