[스프링부트]Springboot REST API

[스프링부트]Springboot REST API

Springboot에서 REST API(REST API개념 바로가기)를 테스트해보자.
스프링부트 프로젝트 기본설정은 아래와 같다.

스프링부트 기본 설정

  • Project: Gradle Project
  • Spring Boot: 2.4.4
    • (SNAPSHOT)은 개발진행중인 베타버전을 뜻 함. (SNAPSHOT)없는 버전으로 선택하기
  • Language: Java
  • Packaging: Jar
  • Java: 8
  • Dependencies: Spring Web


port바꾸기

기존 포트는 80 또는 8080이다.
이미 8080포트를 다른 프로젝트에서 사용중이라면 application.properties에서 손쉽게 포트를 변경할 수 있다.
만약 포트를 9090으로 바꾸고 싶다면 아래처럼 설정해주면 된다.

1
server.port=9090


RestAPI

출처: https://github.com/steve-developer/fastcampus-springboot-introduction/blob/master/04.%20Spring%20Boot%20%EC%8B%9C%EC%9E%91%ED%95%98%EA%B8%B0/%EA%B0%95%EC%9D%98%EC%9E%90%EB%A3%8C/04.%20Spring%20Boot%20%EC%8B%9C%EC%9E%91%ED%95%98%EA%B8%B0.pdf

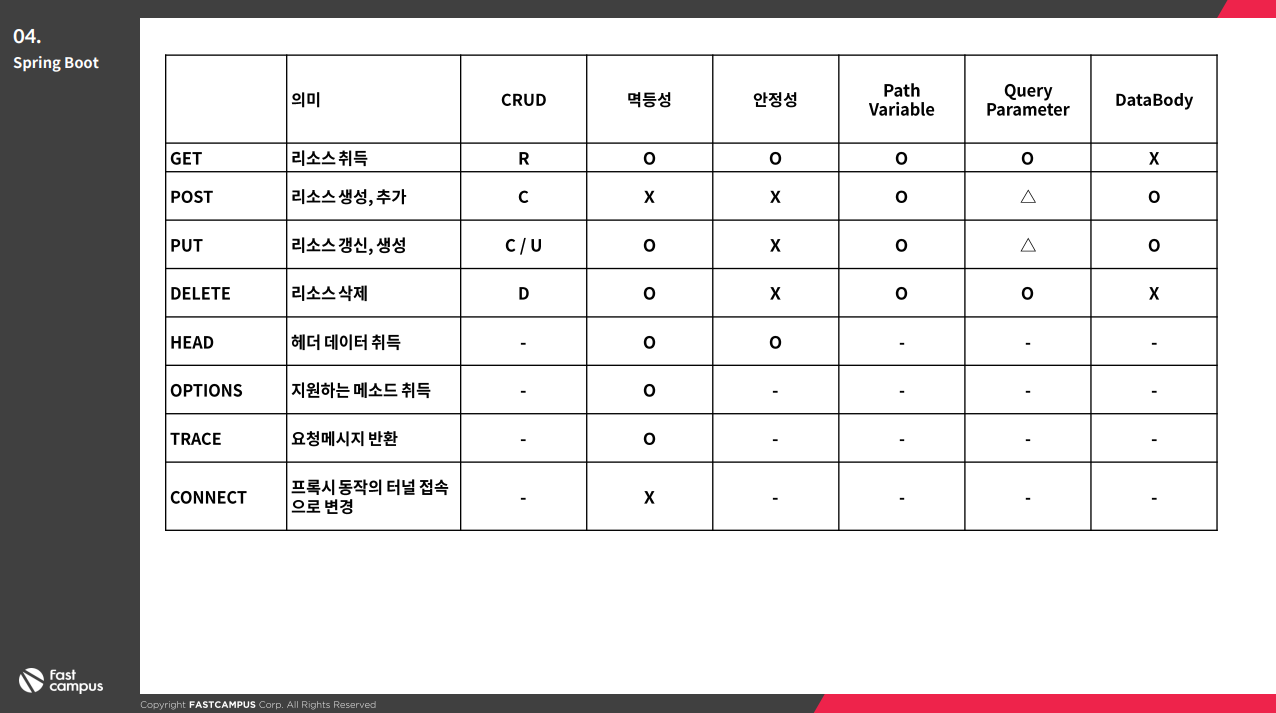
RestAPI를 공부하다보면 멱등성 지원해야한다고 등장하곤한다.
멱등성이란 무엇일까?

  • 멱등성: 연산을 여러 번 적용하더라도 결과가 달라지지 않는 성질

예를들어 아래와같은 PUT메서드 있다고 해보자.

1
2
3
4
5
6
7
요청
PUT /api/events/{id}
{
"type": : "ACCEPT" // ACCEPT/REJECT
}
응답
200 OK

위 PUT메서드를 처음 호출해서 ACCEPT로 바꾼 뒤 한 번 더 호출했을때 이미 ACCEPT인데 ACCEPT요청이 중복이라고 에러가 발생한다면? 이건 멱등성을 지원하지 않는 것이다.
멱등성 지원이 잘 된 경우에는 PUT메서드 호출시 이미 ACCEPT인 경우 그냥 200 OK로 응답하는 것을 말한다.
이런 멱등성을 지켜줘야하는 메서드는 보통 POST메서드 빼고 다~ 멱등성있는 API를 지원해야한다.


파라미터종류

  • PathVariable
    1
    2
    3
    4
    5
    @GetMapping("/path-variable1/{name}")
    public String pathVariable1(@PathVariable String name) {
    System.out.println("pathVariable1: "+name);
    return name;
    }
  • Query parameter
    1
    2
    3
    4
    5
    6
    7
    8
    9
    // 파람이 3개이상되면 너무 많아지므로 DTO를 만들어서 처리하는 것이 좋다.
    @GetMapping("/query-param2")
    public String queryParam2(
    @RequestParam String name,
    @RequestParam String email,
    @RequestParam int age
    ) {
    return name+" / "+email+" / "+age;
    }
  • Data Body
    1
    2
    3
    4
    	@PostMapping("/postdto")
    public void postDTO(@RequestBody postDTO dto) {
    System.out.println(dto);
    }


사용한 어노테이션

어노테이션 설명 사용예시
@RestController 해당 class는 REST API 처리하는 Controller
@Controller return값이 String인 경우 text가 아닌 해당 String값의 html파일을 찾아서 리턴함
@RequestMapping URI를 지정해주는 어노테이션으로 get/post/put/delete 다 작동함. method속성을 이용하여 한 가지방식을 선택할 수 있음, 옛날방식 @RequestMapping(path=”/hi”, method= RequestMethod.GET)
@GetMapping, @PostMapping, @DeleteMapping, @PutMapping @RequestMapping의 최근방식 @GetMapping(“/hello”), @PostMapping(“”), @DeleteMapping(“/{userId}”), @PutMapping(“”)
@RequestBody post보낼때 필수 @RequestBody postDTO dto
@JsonProperty 1개의 변수를 다른 @JsonProperty(“phone_number”)
@JsonNaming DTO 전체 JSON형태를 지정함SnakeCaseStrategy, UpperCamelCaseStrategy, @JsonNaming(value = PropertyNamingStrategy.SnakeCaseStrategy.class)
@JsonInclude JSON데이터에 포함할 속성을 지정 @JsonInclude(JsonInclude.Include.NON_NULL) null값은 빼고 JSON데이터에 담음

https://marketplace.visualstudio.com/items?itemName=maximus136.change-string-case

  • UpperCamelCaseStrategy : “userName” would be converted to “UserName”.


@RequestBody vs @RequestParam vs @PathVariable

구분 설명 주 사용처 URL ContentType
@PathVariable URL경로에 변수를 넣는것 주로 Rest api에서 사용 http://localhost:8080/page/2
@RequestParam URL 파라미터로 값을 넘기는 방식 GET방식에서 주로 게시판 등에서 페이지 및 검색 정보를 함께 전달할 때 사용 http://localhost:8080/page?page=2&pageIdx=77 application/x-www-form-urlencoded; charset=UTF-8
@RequestBody Body 자체를 넘기는 방식으로 POST 에서만 사용 가능함. JSON형태로 전달된 데이터를 해당 파라미터 타입에 자동으로 저장하기때문에 변수명 상관없음 POST방식으로 주로 객체단위로 사용 http://localhost:8080/page application/json; UTF-8;


GET RestAPI

1
2
3
4
5
6
7
8
9
10
11
12
13
14
15
16
17
18
19
20
21
22
23
24
25
26
27
28
29
30
31
32
33
34
35
36
37
38
39
40
41
42
43
44
45
46
47
48
49
50
51
52
53
54
55
56
57
58
59
60
61
62
63
64
65
66
67
68
69
70
71
72
73
74
75
76
@RestController // 의미: 해당 class는 REST API 처리하는 Controller다.
@RequestMapping("/api/get") // URI를 지정해주는 어노테이션이다. get/post/put/delete다 작동함
public class GetAPIController {

// @RequestMapping를 사용하면 get/post/put/delete 다 작동가능
// method속성을 이용하여 한 가지방식을 선택할 수 있음 => 옛날방식으로 요즘은 GetMapping을 사용함
@RequestMapping(path="/hi", method= RequestMethod.GET)
public String getHi() {
return "하이 getHi @RequestMapping사용";
}

// http://localhost:9090/api/get/hello
@GetMapping(path="/hello")
public String getHello() {
return "헬로 getHello @GetMapping사용";
}

// PathVariable
// http://localhost:9090/api/get/path-variable/{name}
@GetMapping("/path-variable1/{name}")
public String pathVariable1(@PathVariable String name) {
System.out.println("pathVariable1: "+name);
return name;
}

// PathVariable 이용시 이름 매칭이 어려울시 // PathVariable(name="")속성을 이용하면 된다.
// 기존에 받아와야할 인수명이 name인경우 PathVariable 이름과도 중복이 된다.
// 이때 PathVariable(name="name")속성을 이용하여 @GetMapping의 {name}과 동일하게 처리해준다.
@GetMapping("/path-variable2/{name}")
public String pathVariable2(@PathVariable(name="name") String pathName, String name) {
System.out.println("pathVariable2: "+pathName);
return pathName;
}

// Query parameter
// 주로 검색할때 사용하는 인자로 URL의 물음표(?)의 뒷부분으로 &연산자를 기준으로 키=밸류 값이 이어진다.
// @RequestParam을 꼭 붙여줘야한다.
// http://localhost:9090/api/get/query-param?user=소원데브&email=sowon-dev@이메일.com&age=77
@GetMapping("/query-param")
public String queryParam(@RequestParam Map<String, String> queryParam) {
StringBuilder sb = new StringBuilder();

// @RequestParam인자를 Map을 사용한 경우 아무 인자 다 받을 수 있어서 key값이 명시적인경우 get으로 이름을 지정해서 사용해야한다.
// 이메일을 불러오는 경우
// queryParam.get("email");
// 명시적인 인자의 경우 아래 queryParam2를 사용하는 것이 좋다

queryParam.entrySet().forEach( entry -> {
sb.append(entry.getKey() + " : " + entry.getValue()+"\n");
System.out.println(sb.toString());
});
return sb.toString();
}

// @RequestParam인자를 Map을 사용한 경우 아무 인자 다 받을 수 있어서 key값이 명시적인경우
// 받을 수 있는 인자가 명확하다면 아래처럼 명시적으로 인자를 받는 것이 좋다.
// 명시적인 경우 int형에 문자열을 넣으면 에러 발생 -> 클라이언트 에러인것을 확인할 수 있다.
// 파람이 3개이상되면 너무 많아지므로 DTO를 만들어서 처리하는 것이 좋다.
@GetMapping("/query-param2")
public String queryParam2(
@RequestParam String name,
@RequestParam String email,
@RequestParam int age
) {
return name+" / "+email+" / "+age;
}

// 가장 추천하는 방법
// 중요한 점은 @RequestParam를 붙이지 않는다
// http://localhost:9090/api/get/query-param3?name=소원데브&email=sowon-dev@이메일.com&age=77
@GetMapping("/query-param3")
public String queryParam2(userRequest user) {
return user.toString();
}

}


Post RestAPI

1
2
3
4
5
6
7
8
9
10
11
12
13
14
15
16
17
18
19
20
@RestController // 의미: 해당 class는 REST API 처리하는 Controller다.
@RequestMapping("/api/post") // URI를 지정해주는 어노테이션이다. get/post/put/delete다 작동함
public class PostAPIController {

// post로 보낼때는 바디에 데이터를 실어보낸다고 표현도 함
// post로 보낼때는 @RequestBody 꼭 붙여줘야함

// Map으로 받으면 어떤 데이터가 들어오는 지 한 눈에 확인이 불가능하기때문에 DTO를 사용하는 것이 좋다.
@PostMapping("")
public void post(@RequestBody Map<String, String> requestData) {
requestData.entrySet().forEach( stringObjectEntry -> {
System.out.println(stringObjectEntry.getKey() + " : "+ stringObjectEntry.getValue());
});
}

@PostMapping("/postdto")
public void postDTO(@RequestBody postDTO dto) {
System.out.println(dto);
}
}


html페이지를 리턴하는 컨트롤러

1
2
3
4
5
6
7
8
9
10
11
12
13
14
15
16
17
18
19
@Controller //html 리소스파일을 찾는 컨트롤러
public class PageController {

@RequestMapping("/main")
public String main() {
return "main.html"; //@Controller을 사용하면 text가 아닌 해당 String값의 html파일을 찾아서 리턴한다.
}

//ResponseEntity
@ResponseBody
@GetMapping("/car")
public Car car() {
Car car = new Car();
car.setCarName("마티즈");
car.setCarNumber(123456);
return car;
}

}


carDTO

1
2
3
4
5
6
7
8
9
10
11
12
13
14
15
16
17
18
19
20
21
22
23
24
25
26
27
28
29
30
31
32
33
34
35
36
37
38
39
40
41
42
43
44
45
46
47
48
49
import com.fasterxml.jackson.annotation.JsonInclude;
import com.fasterxml.jackson.databind.PropertyNamingStrategy;
import com.fasterxml.jackson.databind.annotation.JsonNaming;

@JsonNaming(value = PropertyNamingStrategy.SnakeCaseStrategy.class)
@JsonInclude(JsonInclude.Include.NON_NULL) //null값은 빼고 body에 담는다.
public class Car {
private String carName;
private int carNumber;
private Integer price; //int는 default값이 0이고 Integer는 null이다.

//디폴트 생성자
public Car() {
this.carName = null;
this.carNumber = 0;
this.price = null;
}

public Car(String carName, int carNumber, Integer price) {
super();
this.carName = carName;
this.carNumber = carNumber;
this.price = price;
}

public Integer getPrice() {
return price;
}
public void setPrice(Integer price) {
this.price = price;
}
public String getCarName() {
return carName;
}
public void setCarName(String carName) {
this.carName = carName;
}
public int getCarNumber() {
return carNumber;
}
public void setCarNumber(int carNumber) {
this.carNumber = carNumber;
}

@Override
public String toString() {
return "Car [carName=" + carName + ", carNumber=" + carNumber + ", price=" + price + "]";
}
}


Response 내려주는 3가지 방법

  1. text형태
  2. json형태
  3. ResponseEntity형태(권장방법)
1
2
3
4
5
6
7
8
9
10
11
12
13
14
15
16
17
18
19
20
21
22
23
24
25
26
import org.springframework.http.HttpStatus;
import org.springframework.http.ResponseEntity;
import org.springframework.web.bind.annotation.PathVariable;
import org.springframework.web.bind.annotation.PutMapping;
import org.springframework.web.bind.annotation.RequestBody;
import org.springframework.web.bind.annotation.RequestMapping;
import org.springframework.web.bind.annotation.RestController;

import com.example.demo.dto.putDTO;

@RestController
@RequestMapping("/api/put")
public class PutAPIController {

@PutMapping("/{userId}")
public putDTO put(@RequestBody putDTO dto, @PathVariable(name="userId") String id) {
System.out.println(id);
return dto;
}

// ResponseEntity형태(권장방법)
@PutMapping
public ResponseEntity<putDTO> putResponse(@RequestBody putDTO dto) {
return ResponseEntity.status(HttpStatus.CREATED).body(dto);
}
}


참고

패스트캠퍼스 초격차패키지 Java/Spring 웹개발 마스터 강의를 들으며 공부한 내용입니다.

Comments