I/O2: 노드스트림 - 파일기반 입/출력처리

I/O2: 노드스트림 - 파일기반 입/출력처리

I/O클래스의 구조와 스트림(Stream)

  • I/O클래스의 구조

https://estindev.tistory.com/entry/%EC%9E%90%EB%B0%94-IO-%EC%A0%95%EB%A6%AC


파일기반 입/출력처리 개념

  • 가장 빈번히 사용함.
  • 프로그래밍과정에서 발생하는 데이터를 파일에 저장하거나 파일의 내용을 읽기/복사/이동등은 모두 파일기반 입/출력처리를 사용함.
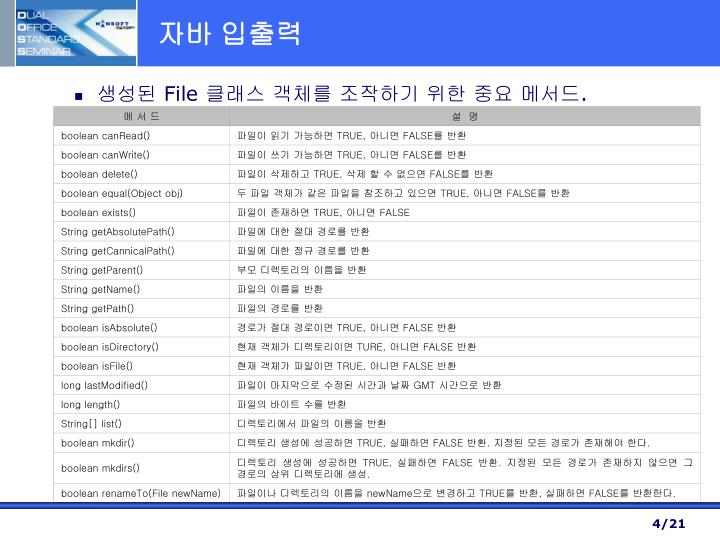
  • File라이브러리의 File() : 파일의 크기, 속성. 이름, 경로에 대한 정보얻기, 파일 생성, 파일 삭제가능.
    • 하지만 파일에서 데이터를 읽고 쓰는 것은 스트림을 통해서만 가능.
  • 파일경로 구분자 : 리눅스 /만 사용 , 윈도우 / 또는 \사용. => 문제가 발생할 수 있으므로 File라이브러리가 제공하는 구분자인 File.separator사용하는 것이 좋다.

https://www.slideserve.com/trella/8


예시

예시1 : 파일 생성과 삭제

  • URI : 통합 자원 식별자(Uniform Resource Identifier, URI)는 인터넷에 있는 자원을 나타내는 유일한 주소.
    • 형식 : 데이터타입:///경로
    • 예시 : phone:///경로, file:///경로, http:///경로 등등
1
2
3
4
5
6
7
8
9
10
11
12
13
14
15
16
17
18
public static void main(String[] args) throws IOException, URISyntaxException{
//구분자 File.separator로 사용
String dirName = "C:"+File.separator+"Temp"+File.separator+"mydir";

File f1 = new File(dirName);
//f1.mkdir()는 새로운디렉토리 생성
f1.mkdirs(); //경로상에 없는 모든 디렉토리 생성

File f2 = new File(dirName, "자바북15장test2.txt");
f2.createNewFile();

File f3 = new File(dirName, "자바북15장test3.txt");
f3.createNewFile();

File f4 = new File(new URI("file:///c:/Temp/자바북15장test4.txt"));
f4.createNewFile();
f4.deleteOnExit(); // 애플리케이션이 종료될때 자동으로 만들었던 걸 삭제함.
}//end of main


예시2 : File클래스를 이용해 현재 경로의 파일 정보 출력

1
2
3
4
5
6
7
8
9
10
11
12
13
14
15
16
17
18
19
20
21
22
23
public static void main(String[] args) {
File currentDir = new File(".");
if(currentDir.exists()){
File[] childs = currentDir.listFiles();
for(File child : childs){
Date time = new Date(child.lastModified());
String name = child.getName();
long length = child.length();
if(child.isDirectory()){
name = "["+child.getName()+"]";
}
System.out.printf("%-20s\t%tF%<tT\t%s%n", name, time, length);
}
}
}
//출력값
.classpath 2020-06-1012:32:21 301
.project 2020-06-1012:32:21 384
[.settings] 2020-06-1012:32:21 0
[bin] 2020-08-1711:15:56 4096
config.properties 2020-08-1312:24:25 96
mylog_0.log 2020-07-2311:12:50 1313
[src] 2020-08-1711:15:55 4096


FileInputStream과 FileOutputStream을 이용한 복사

  • 가장 기본적이고 중요한 코드.
  • 바탕화면에 있는 자바파일스트림테스트.txt 파일을 C:/Temp디렉토리로 복사하는 예시.
  • 해당 파일이 존재하지 않으면 FileNotFoundException이 발생함.
1
2
3
4
5
6
7
8
9
10
11
12
13
14
15
16
17
18
19
public class CopyTest {
//C:\Users\ITWILL\Desktop

public static void main(String[] args) {
File src = new File("C:"+File.separator+"Users"+File.separator+"ITWILL"+File.separator+"Desktop"+File.separator+"자바파일스트림테스트.txt");
File target = new File("C:"+File.separator+"Temp"+File.separator+"자바파일스트림테스트.txt");

try(FileInputStream input = new FileInputStream(src);
FileOutputStream output = new FileOutputStream(target)){
byte[] buffer = new byte[100];
int read = 0;
while((read = input.read(buffer))>0){
output.write(buffer, 0, read);
}
}catch(IOException e){
e.printStackTrace();
}
}//end of main
}


FileInputStream과 FileOutputStream을 이용한 웹상의 이미지 다운로드하기

  • 주로 사용한다.
1
2
3
4
5
6
7
8
9
10
11
12
13
14
15
16
17
public static void main(String[] args) {
try{
URL url = new URL("https://sowon-dev.github.io/img/avatar.png");
InputStream input = url.openStream();
FileOutputStream output = new FileOutputStream("./googleImg.png");

byte[] b = new byte[1000];
int read = 0;
while((read = input.read(b))> 0){
output.write(b, 0, read);
}
input.close();
output.close();
}catch (Exception e) {
e.printStackTrace();
}
}//end of main


FileReader와 FileWriter를 이용한 문서 작성

  • FileReader와 FileWriter는 문자 단위의 데이터를 파일에서 읽고 쓰는 스트림.
  • 처리과정 :
    1. System.in(키보드)
    2. FileWriter
    3. 파일 생성 후 작성 완료
    4. FileReader
    5. System.out(모니터)
1
2
3
4
5
6
7
8
9
10
11
12
13
14
15
16
17
18
19
20
21
22
23
24
25
26
27
public static void main(String[] args) {
File target = new File("C:"+File.separator+"Temp"+File.separator+"diary.txt");
try(Scanner sc = new Scanner(System.in);
FileWriter w = new FileWriter(target, true);
FileReader r = new FileReader(target);){
System.out.println("일기를 입력하세요");
w.write("\n시작 - "+new Date()+"\n");
String str = null;
while(true){
str = sc.nextLine();
if(str.equals("x")){ //일기를끝낼땐 x를 입력
break;
}else{
w.write(str+"\n");
}
}
w.flush(); //퍼버의 내용을 출력한 뒤 비움

char[] buffer = new char[10];
int read = -1;
while((read=r.read(buffer))>0){
System.out.print(String.valueOf(buffer, 0, read));
}
}catch(IOException e){
e.printStackTrace();
}
}

Comments